Week 3
The Full Exposure
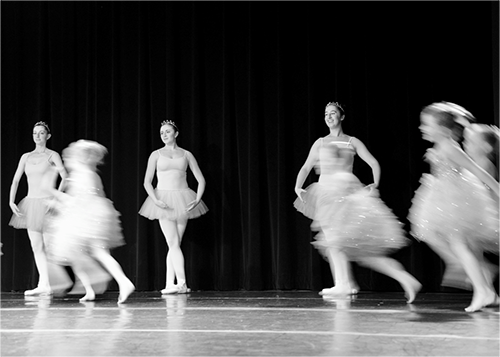
Photographic example of Blurred Motion.
Young dancers running across a stage
appear blurred.
Welcome to Week 3. This week, you will learn the mechanics of the camera and begin combining artistry with camera technique. You will explore the basic camera techniques of stopped motion, blurred motion, panning, and depth of field. You will need your camera manual. If you do not have a hard copy, search for it online. You may shoot on aperture priority for the depth of field shots, and shutter priority for the stopped motion, blurred, and panning shots. Your camera manual will tell you how to put your camera in these modes. Before you begin, be sure to review the examples in the course presentation.
As with every assignment, be sure to take a lot of photographs for each shot, and then pick the best images from the pool. Remember, a good rule of thumb is to take 10 frames of each composition. You will explore the elements of the full exposure, including the shutter speed, aperture (f-stop) and ISO (sensitivity). Read the lessons on exposure and review the presentations before you begin. The lessons supplement the material in your text, which is an important resource, too.
Weekly Objectives
-
Learn proper digital camera operation.
-
Explore experimental lighting and digital special effects.
-
Learn proper resample techniques.
-
Learn basic digital image enhancements using image editing programs.
-
Present digital photographs using basic design principles.
-
Use the fundamental design elements effectively.
Activities
Readings
-
A Short Course in Digital Photography
-
Chapter 3: Light and Exposure
Activities
-
Discussion 3
-
Shooting Assignment 3
-
Quiz 3
Exposure of Photographic Media
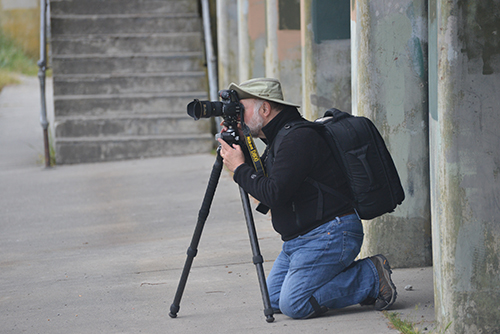
Photographer with tripod, demonstrating
camera handling technique at a
state park in Washington State.
Proper exposure of photographic media is an essential part of obtaining an image. A properly exposed file is necessary to obtain a good print in either the digital or traditional darkroom. A photographer needs to fully understand photographic exposure in order to be successful in producing an image.
This week you will apply basic camera mechanics through exposure and light. It is important to control your digital camera to create properly exposed pictures, while isolating the individual components of exposure. A proper exposure allows you to create dramatic and powerful images without relying on filters or image editing software. It is important to practice working with shutter speed, aperture, and ISO to explore depth of field and controlled motion.
Exposure
Now that you are familiar with the basics of the camera and fundamentals of composition, it is time to put what you are learning together.
Exposure refers to the relative darkness and lightness of a photograph. As photographers, we are concerned first with correctly capturing the brightness level of whatever we are photographing. A properly exposed photograph will convey to the viewer how bright or dark the scene really was. We use our digital camera’s light meter to create a properly exposed picture, but it is important to understand the foundation of exposure so you can use this to your advantage and create dramatic and powerful images without relying on filters or image editing software.
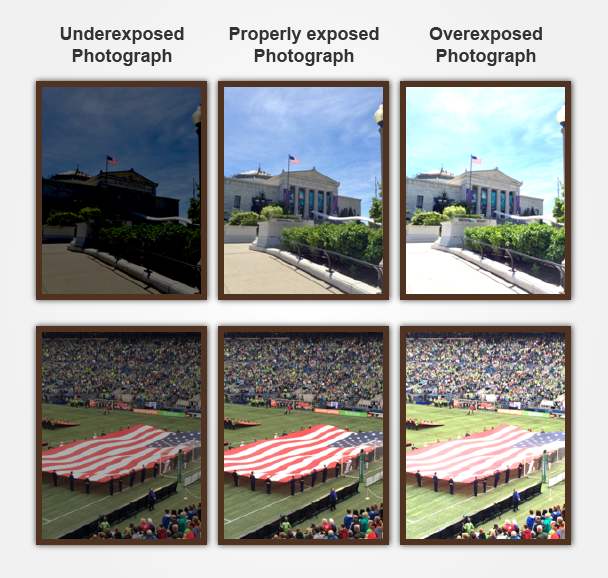
There are three variables which work together to affect the proper exposure:
-
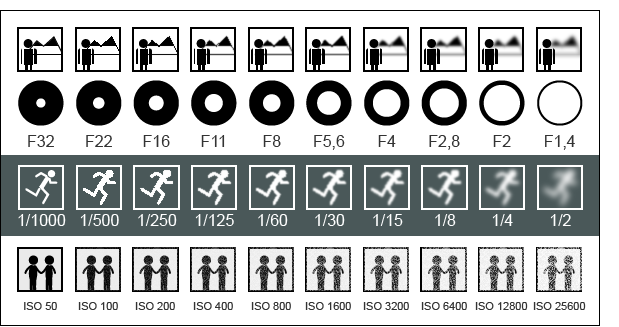
ISO. ISO is the common short name for the International Organization for Standardization. ISO is the degree of sensitivity of the camera to available light. This is called the ISO, and is expressed in numbers. The higher the ISO number, the more sensitive to light (the less light is necessary to make an image). Why not always use a very high ISO then? Because very high ISOs come at a cost-- they do not record fine detail as well, they introduce false information --called noise-- which degrades the image quality. It is true that image editing programs can reduce noise, but your image deteriorates as you do this, as does sharpening.
-
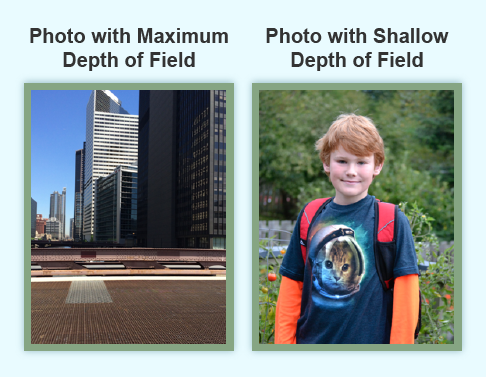
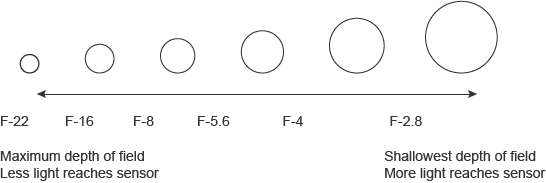
Aperture. The size of the opening of the lens is called its aperture. This is expressed in numbers and is also called f-stops. The smaller the number the larger the opening, the more light is received by the sensor. The higher the number, the smaller the opening, the less light is received by the sensor. The aperture controls the Depth of Field of an image. Depth of field is the distance between the nearest and the furthest objects that give an image judged to be in focus in a camera. It is basically the range of sharpness in an image, from foreground to background.
-
Shutter speed. The shutter opens and closes according to a predetermined duration we can set, and is expressed as a fraction of a second. The longer the shutter stays open, the more light it admits. The faster the shutter moves, the less light it admits.
Putting it All Together
All three of these variables are in play every time we take a picture with our cameras, and changing any one of them causes the need for a change in another one. This is a good thing, because it allows us some flexibility to choose what is important in our picture.
For example, if we wish to freeze a subject moving quickly we must use a very fast shutter speed. But that will require some adjustment in either or both the aperture and ISO. Typically, it means we select a larger aperture and/or a higher ISO rating.
On the other hand, if you need subjects both close and far away to be in focus in the same shot you need a great deal of Depth of Field (also called, depth of focus). That can only be made by using a very small aperture (a larger number), but it will require either or both of a longer shutter opening duration (a slower shutter speed) and a higher ISO. This week you will create a photograph using a wide-open aperture to create a shallow depth of field and take the same photo with a closed aperture to create maximum depth of field.
The Sunny 16 Rule
While digital cameras allow for auto settings, one rule that is important to know is called the Sunny 16 Rule. This is a great way to understand how exposure really works.
Imagine you are out on a sunny day and you were given a manual only camera. How would you take a picture with the proper exposure? Think it would be impossible? Not at all. Here is the rule.
-
Put your ISO at 200.
-
If it is sunny, set your aperture at F/16.
-
Set your shutter-speed to the nearest setting that matches the ISO. If your ISO is 200, set your shutter at 1/250.
This is how you create a picture without a light meter in your camera. As long as you keep your ISO on the same setting, you can modify the aperture and shutter speed.
The table below shows variations on the Sunny 16 Rule where you keep the ISO paired with the nearest shutter speed.

Low Light
If you are shooting in relatively dim lighting conditions and do not want to use a flash, you will need to use a high ISO rating, and quite probably also a large aperture and a slow shutter speed.
Camera Stabilization
Part of being human involves movement. Our pulse, breathing, and muscles do not stay still, so for our own bodies not to make our pictures blurry, we need to use a minimum shutter speed of around 1/60th of a second. 1/125 second is more ideal.
Some folks can hand-hold with no blur down to 1/30 second, but it becomes difficult. Below 1/60th second it is recommended to use a tripod to keep the camera steady. Using a camera lens with a longer focal length, such as a telephoto increases the sensitivity and requires the use of a tripod. Tripods are important tools and can be simple or very complex. Monopods are also very helpful.
In any case, get used to holding your breath when you shoot, and, to smoothly and gently depressing the shutter button. Don't jab at it or stab at the shutter, squeeze it and hold it down until the picture is taken.
White Balance
Digital sensors react to different sources of light differently. Although our eyes cannot detect much difference sensors see colors from the light source we cannot. For example, light from tungsten bulbs carries extra yellow the sensor will record; daylight in shadow appears extra blue; fluorescent light bulbs have a heavy green cast. We can filter out those color casts by adjusting how a white object is depicted in our photographs.
White balance is a term that refers to the overall color cast a digital image has. To arrive at a neutral color cast where the colors of things look like they do in the world we look at how white objects appear in the photograph. You should adjust that in the camera for different lighting conditions, choosing white balance that corresponds to your lighting. Auto white balance can only go so far. You can correct white balance using image editing software if you didn't make the right adjustment to the camera.
You can also download a Word version of Exposure.
Field Guide for Exposure
You can refer to this as a field guide for exposure.
ISO
-
Lower ISO settings (less sensitive settings are like 100 speed and lower) have more detail and less noise.
-
Higher ISO settings (more sensitive settings are like 2000 speed and up) need less light overall, have more noise, and are best for general photographic needs.
-
The highest ISO settings (3200) are good for sports and concerts where you can’t always rely on a flash.
-
It is recommended to manually set your ISO to 200.
F-Stop
-
The number engraved on the lens indicating the relative aperture. (Computed by dividing the focal length of the lens by the diameter of the opening.)
-
The higher the number, the smaller the hole.
-
Each F-stop is exactly double the amount of light. F- 5.6 = 2X F- 8
-
The F-Stop controls “Depth of Field.”
Shutter Speed
Shutter speed is recorded in seconds, and fractions thereof, is the amount of time that light can reach the sensor.
Long Shutter Speed
The longer the shutter speed=more light allowed to reach sensor.
Long shutter speeds: B, 1s., 1/8 s., 1/15 s., 1/30 s., 1/60 s.
Features:
-
It will not “freeze” the action. Things that move will be blurry.
-
With a longer shutter speed, you need to use a tripod, or accept blurred action.
-
It is needed on cloudy days.
Short Shutter Speed
The shorter the shutter speed=less light allowed to reach sensor.
Short shutter speeds: 1/125 s., 1/250 s., 1/500 s., 1/1000 s.
Features:
-
It captures action.
-
It is good for general shooting.
-
Super short shutter speeds are good for sports and action photography.

Bracketing
To ensure proper exposure, you must try several closely related F-Stops, keeping your shutter speed consistent.
White Balance
Light temperature is rated on what is called the Kelvin scale. To ensure that your camera can most accurately read the light, it is best to manually set your white balance.
-
Auto White Balance is acceptable for most situations that are photographed in daylight.
-
Use the Tungsten setting if you are photographing inside with Tungsten lights. Tungsten lights read around 3200 Kelvin. If your white balance setting is set to auto, and you are shooting in Tungsten lights, your images may have a yellow cast.
-
Use the Florescent setting if you are photographing inside with Florescent lights. Florescent lights read around 2800 Kelvin. If your white balance setting is set to auto, and you are shooting in Florescent lights, your images may have a green cast.
Productive Critiques
What is a Critique?
A critique is a staple part of an art education. It is a chance to examine work in a unique situation, pulled out or separated from usual experience for this focused evaluation. It should be a positive and productive dialogue that supports learning and growth for all levels of photographers.
The Importance of Critiques
Photographic images appear everywhere in daily life. A photographer has the opportunity to display his or her photographs in a variety of forms and venues. Photographic images can be hung or projected in an exhibition space, displayed in a web gallery or zine, or published in various media. In each of these presentations, artists are often asked to write or talk about their work to foster a better understanding of the work by the viewer. Writing about other people's work by giving critiques helps photographers understand their own work.
Strategies for Critiquing Images
Certain steps are followed while writing critiques. You can use them to help you come up with your critique comments.
Select each step, or use the Tab and Enter keys to learn more about the strategies for critiquing images.

You can also download a Word version of Strategies for Critiquing Images.
Depth of Field
Depth of field is the distance between the nearest and the farthest objects that give an image judged to be in focus in a camera. It is basically the range of sharpness in an image, from foreground to background.
The concept "depth of field" can be confusing when you are first learning about camera mechanics. Sometimes it is helpful to think about it by focusing on just the aperture. The aperture (F-stop) controls the depth of field of an image.
There are a few "Need to Know" things about the aperture:
-
Aperture and F-stop may be used interchangeably.
-
The number engraved on the lens indicates the relative aperture, which is computed by dividing the focal length of the lens by the diameter of the opening.
-
The higher the number, the smaller the hole.
-
The lower the number, the larger the hole.
-
Each F-stop is exactly double the amount of light of the F-stop before it: F-5.6 = 2x F-8
-
The F-stop controls depth of field.
Depth of Field Example Images
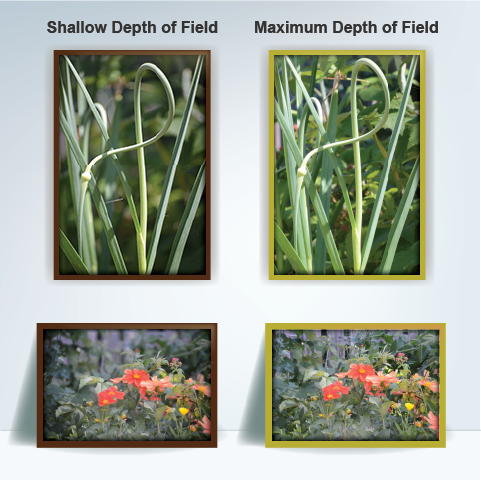
These images will help you to understand the depth of field.
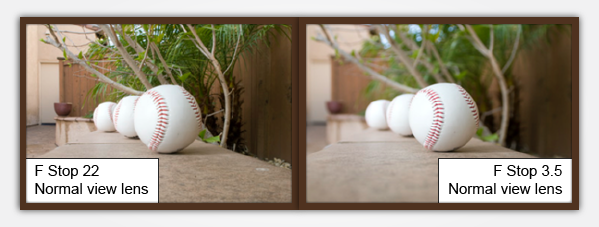
The photographs on the left were taken with a wide-open aperture of 3.5. Notice that the focal point is sharp, but the background is not in focus. The photographs on the right were taken with a closed down aperture of 22. Notice that the focal point is in focus and the background is sharper.
You can also download a Word version of the information on the Depth of Field Example Images.
Depth of Field: Demystified
The concept of aperture (f-stop), lens focal length, and depth of field can be confusing when you are first learning about camera mechanics. Sometimes it is helpful to think about it in a new way. As you learned in the lecture on exposure, the aperture (F-stop) controls the Depth of Field of an image.
Aperture - Need to Know:
-
Aperture and F-stop may be used interchangeably.
-
The number engraved on the lens indicates the relative aperture, which is computed by dividing the focal length of the lens by the diameter of the opening.
-
The higher the number the smaller the hole.
-
The lower the number the larger the hole.
-
Each F-stop is exactly double the amount of light. F-5.6 = 2 x F-8
-
The F-stop controls the Depth of Field.

Depth of field is the distance between the nearest and the furthest objects that give an image judged to be in focus in a camera. It is basically the range of sharpness in an image, from foreground to background.
A Different Angle on Depth of Field
Let’s explore a scenario in which you want to take a picture of people that with different ranges of sharpness from the foreground to the background. Imagine you are standing under the goal post at one end of a football field, facing the far goal post. There is one player standing on each of the yard lines all the way from the first line right in front of you, down the field to the opposite end goal line.
Scenario One: Shallow Depth of Field
If you want only the player standing exactly mid-field to be in focus, and you want all the other players in front of him and behind him to be blurry, you want a very shallow depth of field. You choose a wide-open aperture, such as F 2.8. You adjust the lens focus so he or she is sharp and adjust the shutter speed accordingly. Using a camera’s aperture priority mode is a great way to do this.
This is true also no matter which player you want to be the one in focus, as long as you want the others behind and in front of him to be blurry. Use a wide-open F-stop, and use the lens to focus only the person you want to be sharp. This could be any guy on any of the lines anyplace down the whole field, and anybody in front or behind him will be out of focus.
Scenario Two: Maximum Depth of Field
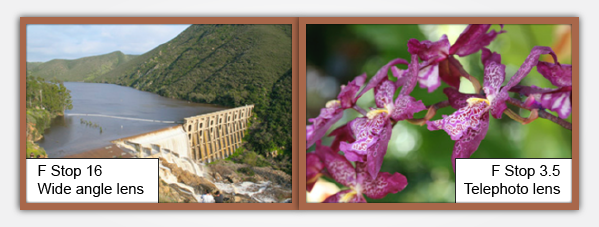
Now what if you want the person at exactly mid-field to be sharp, and you also want people standing behind him/her and in front of him/her to be in focus? For this you would need maximum depth of field. To do this, you would select a small/closed aperture such as F 16. You would still focus the lens on the person mid field, yet by having chosen a small aperture this time, you get a greater depth of field, and people standing behind and in front of him/her are still in focus. Again, you need to adjust the shutter speed accordingly and using a camera’s aperture priority mode is a great way to do this. With small apertures, you are letting in less light, so chances are you would need a tripod to allow a longer shutter speed to compensate for the reduction in light.
This is the basic principle behind Depth of Field regardless of camera or lens. The only thing that needs to stay the same is the ISO for both shots.
Wide angle lenses have by their nature a greater depth of field than telephoto lenses do. So (assuming the f-stop is the same in both cases) that will influence the depth of field you ultimately capture with your camera.
Differences between Wide Angle and Telephoto Lenses
When you are first exploring Depth of Field, use the same ISO and lens. Wide angle and telephoto lenses work similarly with Depth of Field, yet there are subtle differences between lenses of extreme focal length difference.
Shooting the same football scene with a wide-angle lens (such as 28mm) will make it appear as though the distance between you and the players is greater than it looks with the naked eye, while shooting the exact same scene with a telephoto lens (such as 200mm) will make it appear as though the distances between you and the players has shrunk. The telephoto compresses the space, while the wide-angle expands it.
Consider the football field again. Wide-angle lenses make it look like the field is unusually long and angles may be bent or curved. The players will appear to be farther apart and smaller in the frame. With telephoto lenses of 200mm and higher, the same players appear to be standing very close together. The best way to explore this is by taking pictures and experimenting with the lens and paying attention to what you see in the camera.
Keep in mind, this distortion is not the same as Depth of Field. Depth of Field has to do with where the focus and sharpness of the image is. Lens focal length affects how long or short the distances between things appear to be.
You can also download a Word version of Depth of Field: Demystified.
Basic Camera Techniques
Select the play icon, or use the Enter key to watch the video.
This video gives you an overview of basic camera techniques. Watch this video to prepare for the assignments of this week.
Conclusion
This week helped you learn to put it all together, combining camera mechanics with learning to see. Through the process of shooting specific types of images, you learned to control shutter speed and aperture. These are the essential elements of exposure. Remember to keep your camera manual handy. Most professionals keep a copy of it in the bag. Speaking of camera bags, try to get in the habit of keeping your camera with you during the day. Even if you are at work or school, bring it along. When you are driving or walking, you should always keep a look out for potential photographs. Sometimes the unexpected makes the most exciting photographic subjects. As a general rule, though, keep your camera away from excessive heat, cold, or moisture. It is best to avoid leaving your camera in a car, or anywhere it could experience extreme conditions.